Category Archives: crockpot


split pea soup

Instant Pot Split Pea Soup

The recipe is originally from my book The Pantry Principle.  Back then it was designed for a slow cooker.  Now that we have Instant Pots the recipe has been modified.

This is a delicious way to utilize split peas from your food storage.  If necessary this recipe can be modified to also used dried vegetables from your storage however this will require the addition of extra liquid.  See the parenthetical notes in the recipe for food storage modifications.

The addition of the dulse, an edible seaweed found in the North Atlantic, to this recipe adds a wonderful flavor and a big boost of iodine and the other trace elements our bodies need. If you want to make this as a vegetarian dish simply substitute vegetable broth or water for the bone broth.

Making this soup in the Instant Pot is a great way to have a quick hot meal ready to eat after a long day.

split pea soup

Instant Pot Split Pea Soup

Servings 6

Ingredients
  

  • 2 carrots, diced (1 cup dehydrated carrot slices)
  • 2 ribs celery, diced (1/3 cup dehydrated celery)
  • 1 onion, diced (1/3 cup dried onion)
  • 1 pound dried split peas, picked over and washed
  • 2 tablespoons olive oil
  • 2 bay leaves
  • 1 tablespoon fresh thyme
  • 6 cups bone broth 
  • 1 teaspoon sea salt
  • ¼ teaspoon fresh ground pepper
  • 2 tablespoons dulse (a type of seaweed), crumbled

Instructions
 

  • Place all ingredients except salt, pepper, and dulse in an Instant Pot. Stir well to combine. 
  • IP Cook Time 15 minutes  Natural Release approximately 15 minutes.
  • Slow Cooker Time - 8 hours on low
  • Remove bay leaf
  • Add salt and pepper
  • Blend together with an immersion blender
  • Ladle into bowls to serve and top with 1 teaspoon crumbled dulse

hummus

What Is Hummus?

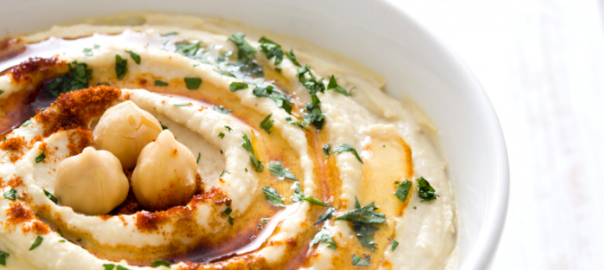
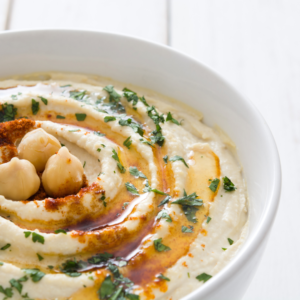
One of the easiest and healthiest snacks you can make is hummus. High in protein, fiber, vitamin 6, and manganese, it tends to be served either with pita bread, crackers, or with vegetables. Not only is hummus delicious and high in protein, it has a huge fan following.

There are songs/music videos (this is just one of them),  movies, and even culinary competitions, all devoted to this humble condiment.

Originating in the Middle East with the earliest known recipes appearing in the 13th century, hummus has become popular worldwide. Traditionally it’s made from cooked chickpeas which are ground up and then mixed with lemon juice, olive oil, salt, and garlic. Purists also call for the addition of tahini, a sesame seed paste, when making traditional style hummus. It tends to be served as an appetizer or a dip. Sometimes it can also be served as a side dish with things like falafel, grilled chicken or fish, or as part of a meze plate

Where to get hummus

Want to know where my favorite place to buy hummus is? The best place on the planet to get it (in my humble opinion)? It’s a tiny little out-of-the-way, hole-in-the-wall place in the Old City in Jerusalem called Abu Shukri. I’ve been fortunate enough to eat there twice, both times with my wonderful Aunt Carol. 

The first time she took me there, in the mid 1990’s, it was a revelation of how amazing hummus, and the falafel and pitot that accompanied it, could taste. Quite frankly it spoiled me for falafel, hummus, and pita for years. You think I’m kidding, but I’m not.  It took a very long time for the memory of that dish to fade to the point that I could eat that again anywhere and not mourn that it wasn’t from Abu Shukri.

The second time was fifteen years later when I went back to Jerusalem. Aunt Carol asked me what was on my list of places to visit. I told her I needed to go back to, “that amazing hummus and falafel place.” I had forgotten the name by then but not the taste. She laughed and said, “Do you mean Abu Shukri?” I said I thought that was it.

So one fine day we made our way to the Old City. After getting lost a couple of times (there’s lots of twisty turns and not well marked alleyways all over the Old City) we eventually found it. To my delight it still looked just as hole-in-the-wall-ish. The intervening years had done nothing for the décor. And their reputation, although still solid, had not encouraged the owners to “fluff it up” and try to make it more appealing to tourists. They have a good thing going and they obviously know it. 

The place even smelled just like I remembered (although I didn’t remember that until I smelled it again). I was salivating before we even got to the counter to place our order. We had a lovely lovely meal together, enjoying the food, each other’s company, and delightful conversation.

Sadly Abu Shukri is pretty far from where I live. I plan to get back there again eventually, but for now I remember it fondly and content myself with making my own hummus at home.  I’ve actually gotten better at making it over the years. I do wonder if part of the flavor at Abu Shukri has to do with the setting and the company (I’m pretty sure it does).

Buying Hummus

Hummus has become so popular that it’s easily available at the grocery store. There are a number of different companies that make it. It even comes in a wide variety of flavors. On a recent trip to the grocery store I was astounded to see the following varieties of hummus in the refrigerated case. Seriously, they had a whole lined up selection:

  • Traditional
  • Mediterranean
  • Greek Inspired
  • Roasted Red Pepper
  • Roasted Pine Nut
  • Jalapeno
  • Siracha
  • Sun Dried Tomato
  • Caramelized Onion
  • Roasted Garlic
  • Chocolate
  • Sea Salt Caramel
  • Cake Batter
  • Chickpea Nutty
  • Lemon Meringue

I confess I was a little puzzled by the Mediterranean style as I was pretty convinced hummus already was a Mediterranean food, but I guess it’s the spices that make the difference.  And I’m really not a fan of the dessert varieties. I confess I did try a chocolate one once (after all…chocolate) but it didn’t really impress me. I have no interest whatsoever in trying the other sweet varieties, probably because I love plain hummus so much that it just doesn’t appeal to me to have it as a dessert.

One of the problems with many commercial varieties is the ingredients. Things like the use of soybean oil instead of olive oil are not a great choice. The olive oil is a healthy monounsaturated fat which is a great source of vitamin E and highly anti-inflammatory. 

Soybean oil, on the other hand, is highly genetically modified.  Even if the variety used in the hummus you are buying is non-GMO, it’s still probably highly contaminated with glyphosate (sprayed to keep down the weeds), is high in omega-6 fatty acids, and consuming it may, over time, contribute to inflammation.

Another issue with commercially made hummus is the added preservatives. The ones that are most commonly used are citric acid, which may be genetically modified, and potassium sorbate. These are not good choices to have in your foods and I do recommend avoiding them.

Making it at home

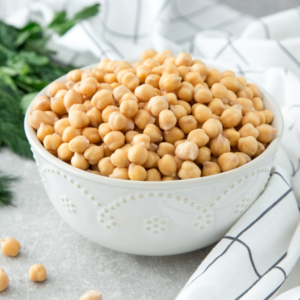
Hummus is actually very easy to make at home. There are two strategies for making your own. The first is to seriously start from scratch and begin with dry chickpeas, sometimes called garbanzo beans. Rehydrating chickpeas is not difficult, it just takes a little time. One of the benefits of rehydrating chickpeas is that there are no added preservatives, it’s just the chickpeas. Another benefit is that you can make extra and freeze them. If you’re not into the idea of rehydrating chickpeas you can always use the canned variety.


Rehydrating Chickpeas

Ingredients
  

  • 2 cups dried chickpeas
  • 6 cups water
  • 1 teaspoon salt

Instructions
 

  • Pick out stones or foreign matter from chickpeas
  • Rinse well and drain
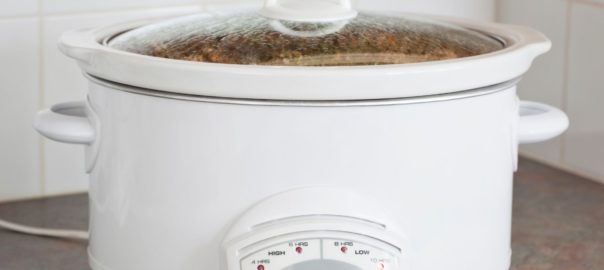
  • Put into crock-pot with water and salt
  • Cook on high 3 hours
  • Remove crock from cooking element and pour chickpeas into a colander to drain
  • Rinse well
  • Chickpeas are now ready to use

Notes

Note: The rehydrated chickpeas will keep in the refrigerator for 2-3 days. If you’d like you can let them dry more and then freeze them.  Frozen chickpeas will keep for up to 6 months

Homemade Hummus

Ingredients
  

  • 2 cups cooked, or canned, chickpeas
  • 1/4 cup water or whey
  • 2-3 tablespoons lemon juice (depending on your preference)
  • 1 1/2 tablespoons tahini
  • 2 cloves garlic, crushed
  • 1/2 teaspoon salt
  • 2 tablespoons olive 
  • garnish: extra olive oil, paprika, and fresh chopped parsley

Instructions
 

  • Combine chickpeas, water/whey, and lemon juice in a food processor
  • Blend together, slowing adding olive oil to the mixture until it starts to stick together
  • Add remaining ingredients
  • If needed add a little more olive oil to make it smooth
  • Spoon hummus into a serving bowl or dish
  • Drizzle with olive oil, garnish with a dusting of paprika and a sprinkle of fresh chopped parsley

Other ways to eat hummus

Whether you choose to buy your hummus pre-made (being sure to read the label and avoid negative ingredients) or make it at home, it’s a quick and easy way to add this delicious dish to your diet. 

Don’t forget that it can be more than just a snack with pita bread or veggies. Here are a few suggestions for other ways to eat this wonderful dish:

  • Use it as a salad dressing - it may need to be thinned just a little with olive oil 
  • It’s a fabulous marinade - perfect on chicken, let it marinate for 2 hours before grilling
  • Instead of mayonnaise - it’s a great way to add flavor to any sandwich or lettuce wrap
  • Eggplant roll ups - made with hummus instead of ricotta is a fabulous dairy-free option
  • Raw-fredo - instead of using a cream sauce try hummus on your pasta or noodles
  • On apples - instead of nut butter and apples, try hummus, you’ll be surprised how good it is
  • Condiment - adding a dollop of hummus on top of scrambled eggs is very tasty
crackpot breakfast casserole

Crockpot Breakfast Casserole

Overnight breakfast success

I love using my crockpot for all different kind of recipes.  And really, there's no reason not to. Crockpots are simple to use easy to clean up, and an energy-efficient way to cook. But as great as they are for dinners and snacks, breakfast is where a crock pot really rocks.
 
There's nothing better than coming downstairs to a nice hot breakfast, ready and waiting. But you didn't have to cook it. Because you made it in the crockpot. After all, if you're willing to leave it on all day to make dinner, why not leave it on overnight to make breakfast? Especially when you're cooking for a crowd. After all if you've got a house full of guests that's the time you don't want to be stuck in the kitchen cooking anyway. So let your crockpot do all the work and you'll look like a kitchen star.
 
This casserole is a family favorite. While it takes a little bit of prep time it's delicious and totally worth it. 
 
Sweet potato crockpot breakfast casserole
Print
Ingredients
  1. Slow Cooker Breakfast Casserole
  2. 2 large sweet potatoes, washed and shredded
  3. 1 onion, chopped
  4. 1 bell pepper, chopped
  5. 2 cloves garlic, minced
  6. 3 tablespoon coconut oil
  7. 1 pound cooked meat - organic and preservative free
  8. 1 cup shredded cheese - we prefer white cheddar
  9. 1 dozen organic eggs
  10. 1 cup whole organic milk
  11. 1 teaspoon herbs of choice - suggestions include oregano, basil, chives, thyme, but you can use whatever you prefer
  12. 1/2 teaspoon sea salt
  13. 1/2 teaspoon fresh ground pepper
Instructions
  1. Grease inside of crock
  2. In a pan saute potatoes in 2 tablespoons coconut oil until starting to brown, remove and set aside
  3. In remaining 1 tablespoon of coconut oil saute onion, peppers and garlic until warmed through and starting to soften
  4. Layer in the crock 1/3 potatoes, 1/3 vegetables, 1/3 meat, 1/3 cheese, repeat layers, top layer will be cheese
  5. Mix together eggs, milk, herbs, salt and pepper
  6. Gently pour egg mixture over layers in crock
  7. Cook on low 8-10 hours (or overnight) until eggs are set
Notes
  1. Delicious served with a little salsa on top
The Ingredient Guru, Mira Dessy https://theingredientguru.com/
For more great crockpot recipes:

Buying The Best Slow Cooker For Your Kitchen

History of The Slow Cooker


When it comes to kitchen convenience the crock-pot, or slow cooker, is one of the best things ever invented.  That’s largely thanks to Irving Naxon who invented the slow cooking Naxon Beanery All-Purpose Cooker in the 1960’s while trying to reproduce his grandmother's cholent stew. 

Cholent is a traditional Jewish food, a stew, that’s made on Friday and set to slow cook for at a low heat until it it’s ready for dinner on Saturday night.  This allowed Jews who were highly observant to avoid turning on an oven or stove as doing so would be a contradiction to the requirement to rest on the Sabbath.  After Irving invented his slow cooking device The Rival Company wound up purchasing the rights to it in 1970.  Technically not all slow cookers are  crock pots.  That brand name is supposed to identify that it’s a Rival product.  All others are simply slow cookers.   If you want to learn more there’s a great podcast episode on Nice Try! - The Crock Pot.


Benefits of Slow Cooking


All these decades later the concept of a simple circular or oval cooking pot with a heated element is a useful and popular way to cook all over the world.  From simple high-low-off style cookers to multi-featured high-end models this device is great for making no-fuss one pot meals.  You set it in the morning and by dinnertime you have a hot and delicious meal ready to go.

A slow cooker is incredibly useful for taking tougher, usually less expensive, cuts of meat and making them very tender.  They’re also fabulous when it comes to cooking and shredding meat. Another wonderful benefit is the low energy usage.  The device uses about the same amount of energy as an incandescent light bulb (remember those?) which is considerably less than turning on your oven. Plus, because the inner pot is usually removable, a slow cooker is incredibly easy to clean up.  Note: I do not recommend using the disposable liners because these are made from plastic and not a good choice for food contact.

If you’re not sure how to use a slow cooker there are a lot of cookbooks that offer wonderful recipes.  Check out any bookstore and you’ll find dozens.  Chances are your local library has some you can borrow, and your neighborhood used book store may even have some as well.


Recipes


Here are a couple of great recipes that are super simple to throw together and let your slow-cooker do all the work.  The first one is my version of a cholent which is inspired by Jamie Geller’s Healthy Chicken Cholent.  The second is a Tex Mex Shredded Chicken that’s fabulous for making taco salads, burrito bowls, or just eating plain.

Chicken Cholent

Ingredients
  

  • 2 pounds baby potatoes, diced
  • 2 pounds carrots, diced
  • 2 - 2 1/2 pounds bone in chicken (I like a combination of breasts and thighs), skin removed
  • salt and pepper to taste
  • 1 large onion, diced
  • 2 cloves garlic, minced
  • 1 tablespoon dry parsley
  • 1 teaspoon paprika
  • 1 teaspoon turmeric
  • 1/2 teaspoon cumin
  • 2 cups cooked chickpeas
  • 4 cups bone broth (*see recipe link below)

Instructions
 

  • Place potatoes and carrots in the bottom of a 5 or 6 quart slow cooker
  • Arrange chicken on top
  • Salt and pepper chicken to your preference
  • Top with onion, garlic, spices, and chickpeas
  • Add bone broth
  • Cover and cook on low for 12 hours or high for 6 hours
    Enjoy!

Tex-Mex Shredded Chicken

Ingredients
  

  • 2 pounds boneless, skinless chicken (breasts or thighs) 
  • 1 1/2 pounds of tomatoes, diced
  • 1-2 jalapeno peppers, seeded and minced (depends on how hot you like it)
  • 4 cups of cooked black beans
  • 4 cloves garlic, minced
  • 2 teaspoons cumin
  • 2-3 teaspoons chili powder
  • 1 teaspoon smoked paprika
  • 2 teaspoons dried oregano
  • 1 teaspoon cayenne pepper (optional)
  • Salt and black pepper, to taste
  • 3 tablespoons fresh lime juice
  • ¼ cup fresh cilantro, chopped

Instructions
 

  • Place chicken in the bottom of a 5 or 6 quart slow cooker
  • Add remaining ingredients except for limes and cilantro
  • Stir to combine all ingredients
  • Cook 8 hours on low or 4 hours on high
  • 30 minutes before you are done cooking remove the lid and shred the chicken with two forks
  • Stir to combine shredded chicken well
  • Cover and cook 30 minutes more
  • Add lime juice and cilantro and stir well
    Enjoy!

Evolution of the Slow Cooker


Although the original idea for a slow cooker started as a low temperature cooking solution for a one-pot meal, they’ve evolved considerably since then.  In fact, we now have the Instant Pot which is a multi-function cooker.  Now you can brown foods, sauté, boil soups or stews, steam and slow cook all in one device.

It’s possible to buy slow cookers in different sizes depending on what the needs are for your household.  When we were raising our kids I had three crock-pots, two large ones and a small one that was great for breakfast casseroles, overnight oatmeal, for appetizers, or for desserts.  Crockpots are fabulous for breakfast because the meal cooks while you’re sleeping and you wake up to a hot breakfast with very little effort.

Now that the kids are grown and out of the house I have my original crock-pot which is still going strong after 40 years.  The lid has been replaced, but the original device continues to help me easily make delicious meals for my family.  I’ve also got an Instant Pot at this point.  Initially I resisted it thinking I had a crock pot and didn’t need one.  But now that I have it I love the multi-function ability and find that I use both on a regular basis.

When it comes to picking the right device for your kitchen, take the time to think about what’s important to you.  What size is you family?  How often do you plan to use your slow cooker?  What kind of meals or dishes will you make in it?  By taking the time to research it you’ll find the best option for you.  And who knows, you may even find it’s so convenient that you’ll need more than one. 

Pot Pie Makeover

The comfort of pot pie

One of my favorite meals is pot pie.  When the weather gets cold and wintry, there is nothing more warming and delicious than a pot pie.  It's also a wonderful convenience dish. Filled with meat and vegetables, it's a meal in one dish.

What's in the box?

For many people pot pie is something that comes in a box from the freezer section at the grocery store. While certainly convenient, these tend to come with a variety of ingredients that are not a great choice. Here, for example, is the ingredient list from

Stouffer's White Meat Chicken Pot Pie:
Water, Chicken Meat White Cooked, Flavor(s) Chicken, Chicken Powder, Chicken Broth Dehydrated,
Food Starch Modified, Carrageenan, Cellulose Gum, Dextrose, Flavor(s), Salt, Whey Protein
Concentrate, Mono and Diglycerides, Cream Whipping, Apple(s), Flour Bleached Enriched, Wheat
Flour Bleached Enriched, Carrot(s), Celery, Chicken Fat, Egg(s) Yolks Dried, Niacin, Milk Non-Fat
Dry, Onion(s), Peas, Polysorbate 80, Iron Reduced, Salt, Sodium Citrate, Chicken Base, Contains BHA,
Contains BHT, Canola Oil, Caramel, Corn Syrup Solids, Lard, Maltodextrin, Riboflavin (Vitamin B2),
Soy Lecithin, Thiamine Mononitrate (Vitamin B1), Corn Starch Modified

44 ingredients! Going through this list one by one would be a rather long endeavor so I'll skip to the chase and point out that there are GMO's, lots of chemicals, known carcinogens, possible MSG, probably pesticides, and potentially heavy metals in this box.  There's also a nasty ingredient called carrageenan which can cause intestinal distress and has some other unpleasant side effects. Not very tasty in my book.

So what's the answer?  

For me it's making my own pot pie.  14 simple real food ingredients (15 if you include the seasoning on the meat).

Before when making pot pies I used to cook a chicken or a turkey and then dice up the leftover meat to use in a pot pie.  Certainly a convenient way to make use of the leftover meat, but rather time consuming.  Recently I had an epiphany.  Why not shred the meat instead.  I theorized that the shredded meat would be just as nice in the pot pie, but could potentially be made much easier than having to roast a bird, carve off the meat and then cut it up.

Using my crockpot, one of my favorite kitchen appliances, I made shredded meat overnight.  I actually wanted to try making pot pie and chili with shredded meat so I cooked enough meat for both dishes.  Using two turkey breasts and six chicken thighs (to get a good mix of white and dark meat), I put them in the crockpot with seasonings (I used Kirkland's No Salt Seasoning and some fresh ground pepper) and 1/4 cup of nourishing broth.  I let it cook on low all night.  In the morning when I got up the meat was fully cooked and so tender that it shredded without any difficulty simply using two forks.  

Sidenote:  I use my crockpot overnight on a fairly regular basis.  I figure just because I'm asleep doesn't mean my crockpot can't be working for me.  Nourishing broth, soaking beans, overnight cereal, marinara sauce, all kinds of things work well in the crockpot overnight to be ready to use when you wake up in the morning.

Updating your pot pie

As much as I like pot pie, over the years I've become less and less enamored of the idea of eating my meals encased in a crust of dough, especially a gluten based dough.  Although it's possible to make gluten-free pie crust, I'm not very good at it (and not particularly interested in spending the time on it these days).  So I've come up with an alternative.  I make dumplings and serve that as the top “crust.”  It's delicious without being overwhelming in the way of simple carbs. It also requires a little less labor.  The dumplings are great because they provide just the right amount of toothsomeness to the pot pie; the right balance to top off the delicious filling.

Here's my basic-ish recipe for a pot pie.  This recipe is for mushrooms and peas because that's what I had on hand when I made it last.  Usually the vegetable part of a pot pie is somewhat flexible which is one of the things that makes it such a wonderful dish to have in your repertoire. The recipe does include bone broth which makes it tastier and more nourishing.  Enjoy!

GF Dumpling Pot Pie
Print
Ingredients
  1. Gluten Free Dumpling Crusted Pot Pie
  2. 10-12 baby bella mushrooms, cleaned and sliced
  3. 2 T. organic butter
  4. 1/4 C. gluten free flour (these days I'm using Namaste and really like it)
  5. 1 C. nourishing broth
  6. 2 C. whole fat organic milk
  7. 1 heaping t. dried onion
  8. 1/2 t. dried thyme
  9. 1 t. sea salt
  10. 3 C. shredded chicken
  11. 2 C. peas, frozen or fresh
Instructions
  1. Preheat oven to 400F
  2. Grease a 2 quart casserole dish
  3. Melt butter in a large sauce pan
  4. Add mushrooms and stir gently until mushroom soften
  5. Add flour and toss gently, coating mushrooms
  6. Add broth and milk, stirring well to incorporate fully and bring to a boil
  7. Reduce heat and add onions, salt, and thyme, cook 5-7 minutes until sauce begins to thicken
  8. Add meat and peas
  9. Top with dumpling crust
  10. Bake 30-35 minutes
The Ingredient Guru, Mira Dessy https://theingredientguru.com/
GF Dumpling
Print
Ingredients
  1. 1 cup gluten free flour
  2. 2 t. baking powder
  3. 1 t. dried parsley
  4. 1/2 t. dried dill
  5. 1/2 t. fresh ground black pepper
  6. generous pinch sea salt
  7. 1/4 cup organic butter
  8. 1/2 cup whole fat organic milk
Instructions
  1. Combine flour, baking soda, and seasonings mixing well
  2. Slice butter into thin pats and then blend into flour mixture until it resembles cornmeal
  3. Add in milk and combine fully until it forms a dough
  4. Drop by tablespoonfuls onto top of filling
The Ingredient Guru, Mira Dessy https://theingredientguru.com/
winter soup

Winter Soup

It's still winter

We've made it past the winter solstice and the days are slowly getting longer. But the weather is definitely cold and damp. And it still gets dark pretty early. On days like that, I think there's nothing like a nourishing, warming winter soup. Combined with a simple salad and a delicious cheesy biscuit, it makes a perfect dinner at the end of the day. Plus it's an easy meal that comes together pretty quickly.


Winter Soup
Print
Ingredients
  1. 3 ribs celery, diced
  2. 1 white onion, minced
  3. 2 lbs boneless skinless chicken breasts, cut into bite-sized pieces
  4. 1- 15 oz can diced tomatoes, with juice
  5. 1 large sweet potato, peeled and diced
  6. 1/2 cup spinach
  7. 1 large zucchini, diced
  8. 3 cloves garlic, minced
  9. 4 cups bone broth
  10. 1 tbsp dried basil
  11. 2 tsp dried oregano
  12. 1 tbsp dried parsley
  13. Optional: add 1 small hot pepper for a bit of a warming kick - if this is too spicy, the pepper can be cooked separately and added to the bowl before serving
To make in the Instant Pot
  1. Add all ingredients into the pot and stir to combine
  2. Seal and cook on manual high for 20 minutes
  3. Natural release 10 minutes then quick release
To make in a slow cooker
  1. Add all ingredients and stir to combine
  2. Cover and cook high 3-4 hours/low 6-7 hours
  3. Add salt and pepper to taste
  4. Garnish with fresh parsley
  5. Enjoy!
The Ingredient Guru, Mira Dessy https://theingredientguru.com/
 
For quick and easy cheesy biscuits I use this recipe from Pamela's and add 1/4 cup of shredded cheese. I get perfect gluten-free biscuits every time.
 
Summer Vegetable Soup - The Ingredient Guru Recipe

Instant Pot Summer Vegetable Soup

I love my Instant Pot

Ever since I got an Instant Pot® (IP) it has become my favorite appliance. I use it so much that I got tired of dragging it up from the cupboard under the counter and now it lives on my kitchen counter full-time.  It gets used regularly for a wide variety of dishes.  That includes for summer meals. 

Just because it's summertime doesn't mean that we should not eat soup. And while there are lots of delicious cold summer soups, like this amazing gazpacho, even hot soups can be a wonderful summertime dish because they take advantage of the season and what's fresh.  Of course just because we want to enjoy summer soups, doesn't mean we want the heat and humidity in our kitchen that comes along with cooking soup. That's where the instant pot is such an amazing kitchen tool. it takes so much less time and therefore adds less heat to the kitchen.

This recipe is so quick and easy to put together that it's sure to become one of your summertime (or anytime) favorites. And one of the best things about it is that it's actually a pretty flexible recipe. Don't have green beans? Use lima beans.  Or asparagus. Don't have zucchini, add mushrooms. You really can add a wide variety of vegetables to this.  (pssst…I've sometimes been known to clean out my crisper drawer by simply throwing a bunch of veggies into the instant pot, following the general proportions of this recipe, adding bone broth, herbs, and letting the IP do it's magic.)

Instant Pot Summer Vegetable Soup
Print
Ingredients
  1. 1 tablespoon extra virgin olive oil
  2. 3 cloves garlic, minced
  3. 4 large stalks celery, chopped
  4. 4 large carrots, sliced
  5. 1 medium red onion, chopped
  6. 1 cup green beans, cut into pieces
  7. 1 cup zucchini or summer squash, diced
  8. 8 cups bone broth
  9. 1 pound red potatoes, quartered
  10. 1 teaspoon fresh rosemary, minced
  11. 1/2 teaspoon fresh thyme, minced
  12. 1 teaspoon fresh parsley, minced
  13. 1 pint cherry tomatoes, chopped
  14. 2 cups fresh baby greens such as kale, spinach or arugula
  15. Sea salt and fresh ground black pepper to taste
  16. 2 tablespoons fresh lemon juice
  17. Parmesan cheese, freshly shaved or grated
Instructions
  1. Add olive oil to liner pot and set function to Sauté
  2. Add garlic, celery, carrots, and onion,
  3. Sauté until onion is wilting and golden in color, approximately 4-5 minutes
  4. Add green beans, zucchini, potatoes, tomatoes, herbs, salt and pepper
  5. Add bone broth and stir to combine
  6. Put on lid and lock into place, setting the vent to “Sealing”
  7. Set pot to “Manual” for 3 minutes
  8. When cooking time is finished, allow pressure to release naturally for 10 minutes, then manually release any remaining pressure
  9. Remove lid and add baby greens and lemon juice, stirring to combine well
  10. Serve immediately topped with freshly shaved or grated Parmesan cheese
  11. Enjoy!
The Ingredient Guru, Mira Dessy https://theingredientguru.com/

More delicious summer recipes

Here are a few more fabulous summertime recipes

Favorite Instant Pot Tools

I was a little late jumping onto the Instant Pot train, but now I really can't remember what I did without it!  It is my absolute favorite tool in the kitchen. Pressure cooking made easy-as-pie (hmmm... I haven't tried making a pie in my pot yet...)  The ease alone would be enough but Instant Pot takes it even further - a slow cooker, rice cooker, steamer, warmer and sauté pot, and that's just the 6-in-1 model.  The 9-in-1 model also makes yogurt, cooks eggs, sterilizes AND makes cake. All this multi-tasking, no hogging my kitchen counter space - it's a keeper. So I've given my Instant Pot it's very own drawer, to store all its handy accessories.  Here are my favorites.

TEMPERED GLASS LID
A clear glass lid is perfect for when slow cooking, sautéing, keeping food warm, or even serving direct from the pot.
Instant Pot Tempered Glass Lid

STAINLESS STEEL INNER COOKING POT
Having a second inner pot makes it really easy to prepare multiple dishes. I find it especially handy when I’m meal-prepping. I can make a main dish, and then quickly pop in a new inner and make quinoa, rice a veggie and such. It’s almost as handy as having two Instant Pots.
Instant Pot Inner Cooking Pot

SEALING RINGS
The Instant Pot lid sealing ring is made of silicone. It’s really durable and will last you a long time. It can, however, hold onto food odor. I wash mine in my dishwasher after each use. I also periodically “steam-clean” it in the pot - toss a couple cut up lemons and a cup of water into the pot and cook on manual high pressure for fifteen minutes. I do have a second ring to use when I make a neutral or sweet dish and I really want to ensure no savory aromas are transferred.
Instant Pot Sealing Rings

STACKABLE INSERT PANS
Stackable insert pans are great when you have more than one dish you can cook at once – steaming, cooking veggies and rice. Or cooking two dozen hard-boiled eggs at a time. These make reheat leftovers in the Instant Pot so easy and fast, a much better choice than using a microwave.
Stackable Stainless-steel Insert Pans

STEAMER BASKET
A steam basket or rack is essential for Instant Pot cooking. I especially like one with moveable sides so it can adjust and accommodate food of all shapes and sizes. I like the extendable removable handle on this XOX model, it’s handy when lifting hot food from the pot.
OXO Good Grips Stainless Steel Steamer with Handle

TRIVET-RACK-STAND
I use a taller trivet in addition to the trivet that comes with the Instant Pot, so I can cook in several layers. I’ll often cook things like sweet potatoes on the lower level and place an entrée in a pan above on the higher level. If you do this, take care that the height of the tallest item is not higher than the pot’s maximum fill line.
Trivet Rack Stand

HOT POT GRIPPER CLIP
Sort of like a hot pad’s much stronger studier weight-lifter cousin. Just clip the grip end onto the hot pot, or pan or basket and lift it from the Instant Pot. My friend Coleen, an Instant Pot veteran, gave me these when I first got my pot. She was absolutely right about how much I’d love them!
Hot Pot Gripper Clip

CHEESECAKE PAN
Perfect for cheesecake, tarts, quiches and more cheesecake. This pan was designed with Instant Pot cooking in mind, it has a handle for lowering into and lifting out of the pot. The only problem I have found with this pan is that it is too easy to make cheesecake. It's very tempting to have cheesecake every week. LOL
Stainless Steel Cheesecake Pan

YOGURT MAKER CUPS
My Instant Pot doesn’t have the Yogurt function (sad face) so this yogurt maker cup set is on my wishlist for now. When it’s time to give my pot an Instant Pot sister, it will be the yogurt-making 10-in-1 model.

COOKBOOKS: Now that I have an instant pot and love the versatility of this device I realized I needed a couple of cookbooks to help me find delicious recipes as well as instructions for standards like chili. Here are the ones I have: The Ultimate Instant Pot Cookbook  and Dinner In An Instant 

If you loved this list, be sure to check out my Favorite Kitchen Tools list. I've done the research so you don't have to!


Affiliate Disclosure: Recommendations I share on my website may contain affiliate links. If you click through my referral link, at no additional cost to you, I may earn a small commission if you make a purchase. I only recommend products and services I use myself and would share with friends and family. Your purchases from these companies through my links helps me continue to bring you free information on my site.

crockpot shredded chicken

Use Your Crockpot To Beat The Summer Heat

It's getting hot here in Texas

And the humidity isn't far behind. Once the humidity hits stepping outside is like walking into a sauna.

With all of that heat and humidity, it's no wonder dinner time is seen as more of a chore in the summer. After all, who wants to heat up the kitchen when it's already hot and sticky outside? And here in Texas, we're not the only ones. Although we get the heat early, summertime and hot temperatures are about to hit all around the country. The good news is in spite of the heat outside, you can still have a delicious meal without raising the temperature indoors. It's easy when you use a crockpot.

So, how does crock pot cooking beat the heat? Simple, it uses less heat than an oven or the stovetop. In addition to using less heat to cook the food, a crockpot also doesn't heat up the environment the same way. This means you don't need to crank up the air conditioning, run a fan, or start your swamp cooler to reduce the additional heat from ovens and stoves.

Crockpots are also a great energy-saving device and the operating costs are very low. Especially when compared to electric stove and ovens, but even when compared to gas. So not just from a heat standpoint, but from a cost to operate standpoint as well, this makes crockpots a great resource.

Not just for winter anymore

If you're like most people you think of crockpots as being more for wintertime use. Great for making soups, stews, and chili. But truthfully crockpots are good all year round. I love mine and use it for making snacks, breakfast, and even for making shredded meats for summer salads. Crockpots are actually very versatile and can be used for a wide variety of meals and foods.

Benefits of Crock Pot Cooking

As well as being less expensive to run, crockpots have a number of benefits that make them a great addition to any kitchen:

  • All the work is done ahead of time making mealtime and cleanup a lot easier. If you're making breakfast, you're starting it the night before so there's less cleanup while you're trying to get out the door. If you're making dinner, it makes getting dinner on the table faster and easier at the end of a long day.
  • A lot of crockpot dinner recipes are a meal in a dish. Make a salad or a side dish to go with it and you've got a nutritious meal for your family. If it's a stew or a chili you can bulk it up with extra veggies and up your daily count of veggie servings.
  • Cleanup is a breeze. Usually, with crockpot cooking, there's the cleanup from the prep and then just one dish (the crock) to clean when you're done. This means you're not only spending less time cooking, but you're also spending less time cleaning up.

Have a couple of crockpots is, in my humble opinion, a good idea. I have one large one for the main dishes or large items and one small one for side dishes, appetizers, desserts, and that sort of thing. They're versatile, easy to use and make life much simpler.

Take it to the next level

Combine crockpot cooking with the Fast Fun Freezer Meals program and you'll really beat the heat. This program allows you to get 20-24 servings of dinner in the freezer ready-to-cook in 90 minutes or less. Sounds unbelievable but it's true. And when you're ready to cook simply pull your meal out of the freezer the night before. Pop it in the crockpot in the morning and at the end of the day you've got a hot, delicious meal, but the kitchen is still cool. Make a salad or side dish and dinner is done. Best of all cleanup is a breeze because you did most of it when you prepped the meal.

Less work, less time in the kitchen, no hot sticky mess. Crockpot dinners are definitely the way to go.

More great crockpot recipes

More delicious summer recipes

Here are a few more fabulous summertime recipes


Kitchen Tools

I frequently get questions from people wanting to know what sorts of tools I have in my kitchen.  I get the impression that folks think I have a huge gourmet kitchen with all of the latest gadgets and fancy equipment.  While I have at time had kitchens that are very large, right now I have an extremely tiny, inefficiently designed kitchen with approximately 3 feet of usable counter space.  We're eventually going to redesign the space but for now we work with what we have.  And I'm here to tell you that it is possible to make real food meals even in a tiny space.

I do, however have a number of important tools that I use on a regular basis.  This is a list of appliances, it does not include other kitchen tools which are a definite must have such as a good chef knife, paring tool, grater, etc.  Here are five of my favorites and how I use them.    These are listed in no particular order:

Crockpot – I can't say enough about this wonderful appliance.  I write about crocking frequently and share a number of great recipes.  It truly is one of my most versatile appliances, I use it for breakfast, dinner, snacks, and as a means of preparing some of my foods such as rehydrating beans.   One of these days I will buy my dream crockpot/slow cooker, a VitaClay.

Vitamix – I use my vitamix on a regular basis to make smoothies and other great recipes.  It's great for frozen desserts as well as for mixing nut butters, making alternative milks, and more.  I don't use it for dry mixes as I don't have a dry grains container but if you bought one you could do that too.

Immersion Blender – my immersion blender is the handiest, dandiest, most wonderful small appliance ever invented.  I use mine for making dressings, mayonnaise, blending soups and more.  I no longer use my applesauce mill (although it's a way cool looking appliance) because I use the immersion blender instead.  It's worth it to get the one with the attachments so you can chop herbs and other things in the little container attachment.

Pressure Cooker – I can't believe I waited so long in my life to get one of these.  They are, quite simply, fabulous!!!  I make many meals in the pressure cooker mostly because it's so very quick and easy.  Our family favorite is my curried rice and beans but I would highly suggest getting Lorna Sass's terrific book Cooking Under Pressure; everything I've made from this book has been great.   If you're going to get a pressure cooker of your own consider getting a combination pressure canner and cooker.

KitchenAid Mixer – for many years (and I mean A LOT) I mixed everything by hand and it sure took a long time to get things done sometimes.  Especially around the holiday season with all that baking.  Then my amazing DH bought me a KitchenAid Mixer and I've never looked back.  I use it for more than mixing cookie dough.  When I make a meatloaf or meatballs, it all goes in there and I let the machine do the work.  If you get some of the fancy attachments you can make pasta, sausages, ground meat, and more.  This is definitely a cool machine to have around.

And one more thing…

One Gallon Jar – okay, so not an appliance, but still, you need one (or more) gallon glass jars if you're going to make kombucha.  This is a permanent fixture as I keep my culture going.  On a side note, this is also an excellent reason to avoid harmful chemical exposure from plastic and recycle other glass jars.  1/2 gallon ones are great for a kombucha scoby bank.  Snapple jars (friends give these away by the dozens) are great for taking your kombucha drink with you.  And I collect other jars to store all sorts of dry goods or even leftovers in. Glass jars are definitely a good thing.

Interested in finding out what I cook in my kitchen?  Be sure to get a copy of The Pantry Principle.  It has delicious recipes for breakfast, soups, condiments, desserts, and more.

standard disclosures apply