Monthly Archives: August 2019

Instant Pot Vs. Air Fryer

What do you do if you’re an Instant Pot fan, you really want to get an Air Fryer, but you have no kitchen counter space? Do you have to pick one or can you have both? This was me. Fortunately, I found a solution.

I love my Instant Pot

I’m a big Instant Pot fan. Ever since I got mine it has migrated to live permanently on the kitchen counter and I use it several days a week for a wide variety of things. When I got my Instant Pot I was able to get rid of my popcorn popper, my rice cooker, and my pressure cooker. My husband was pushing for me to get rid of the slow cooker as well but I defended it because (a) I’ve had it since I was 18 and I’m kind of attached to it, and (b) when you have a party sometimes you need an extra cooking device.

For me, having an Instant Pot has been a game-changer in my kitchen. I use it for a so many things, especially this delicious Instant Pot Summer Vegetable Soup.

But I want an Air Fryer Too

When I heard about Air Fryers I was tempted. I'm seeing them everywhere. They are very popular and everyone seems to be getting one. But after much careful consideration, I decided not to get one.

Sure an Air Fryer is a cool idea. It uses only a tiny bit of oil plus some heated air to ‘deep fry’ your food. Okay, it’s great that you can make “fried” foods that are healthier and cook them really quickly. I was seriously tempted.

But then I looked at my kitchen and realized that counter space was at an all-time premium. In fact, I joked that if Instant Pot came out with a new version that did air fryer plus the other 11 functions I would be all in, but until then I was sticking with my IP. 

How does an air fryer work?

For all you Air-Fryer-Curious people, let’s look at how an air fryer works. Unlike the multi-function Instant Pot, it’s pretty much a single-use device. With just a little bit of oil, a high temperature (an average of 392°F / 200°C according to my research), and air circulating rapidly, you get convection cooked food with a “fried” texture. Due to the convection cooking, foods do cook in much less time than actual frying.

Although the process is somewhat similar to a deep fryer, the Air Fryer uses a lot less oil so the idea is that you are getting a healthier “fried” food. This cuts down quite a bit on the fat and calories. However, you still get to enjoy the crispiness of fried foods. 

The Solution

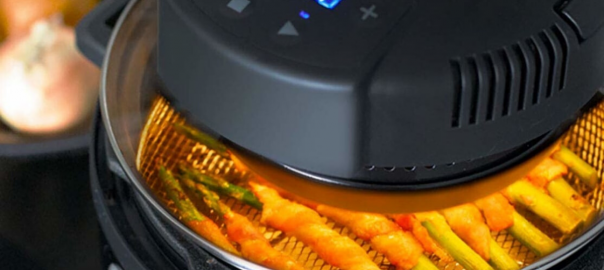
While I wasn’t prepared to give up my Instant Pot I was very tempted by the idea of an Air Fryer (have I mentioned that?). Then a friend shared something I had never heard of before. A Mealthy Crisplid.

What is a Mealthy Crisplid? It’s a lid that converts any 6 or 8 quart Instant Pot or electric pressure cooker into an Air Fryer. It’s kind of like the best of both worlds because you get to keep your Instant Pot but you don't have to have another big counter-space-required appliance for air frying.

I was blown away by this concept. And I bought one.  Of course, now I’m having to learn how to make air-fried things. And while I don’t plan to make a lot of them, it’s a nice way to be able to add that to our meal planning.

Basic Tips

I’m still learning how to use my crisplid, but I’ve learned a couple of tips that are important whether you have an air fryer or a crisplid.

Do the Prep Work

Prep work is key for this method of cooking. You have to take your time to make sure that things are properly coated, that they’re seasoned or oiled as required, and that you’ve followed instructions on how to prep the food. The recipes are not like traditional deep-fried recipes where you can just throw it in the oil and it mostly sticks together. 

Loading Your Air Fryer

You’ll need a basket to hold the food in so that it can get good circulation (the Mealthy comes with a trivet and a basket). I’ve learned the hard way that you need to (a) not overcrowd the basket, and (b) flip the food partway through to make sure the browning and crispiness is even. I’m still working on perfecting French fries (this is where I’ve really learned the importance of not putting too much into the basket).

Be aware of temperatures

Your Mealthy, and I’m assuming an Air Fryer too, gets HOT. You need to use caution when handling it, have a good surface to set the lid down when flipping items over, be careful when handling the parts, and remember the foods come out fried-food-hot. You also need to wait until the device is completely cool before you clean it. So caution and patience are the words of the day here.

Quick Recipes

If you're looking for a solution to the Instant Pot vs. Air Fryer dilemma, this may just be the answer you are looking for.

As I mentioned above, I'm still learning, but here are a few quick recipe ideas that I’ve found as I’ve been doing my research. I’m going to keep experimenting and learning as I continue to use my Mealthy Crisplid but I’m glad I got it.

Mozzarella Sticks

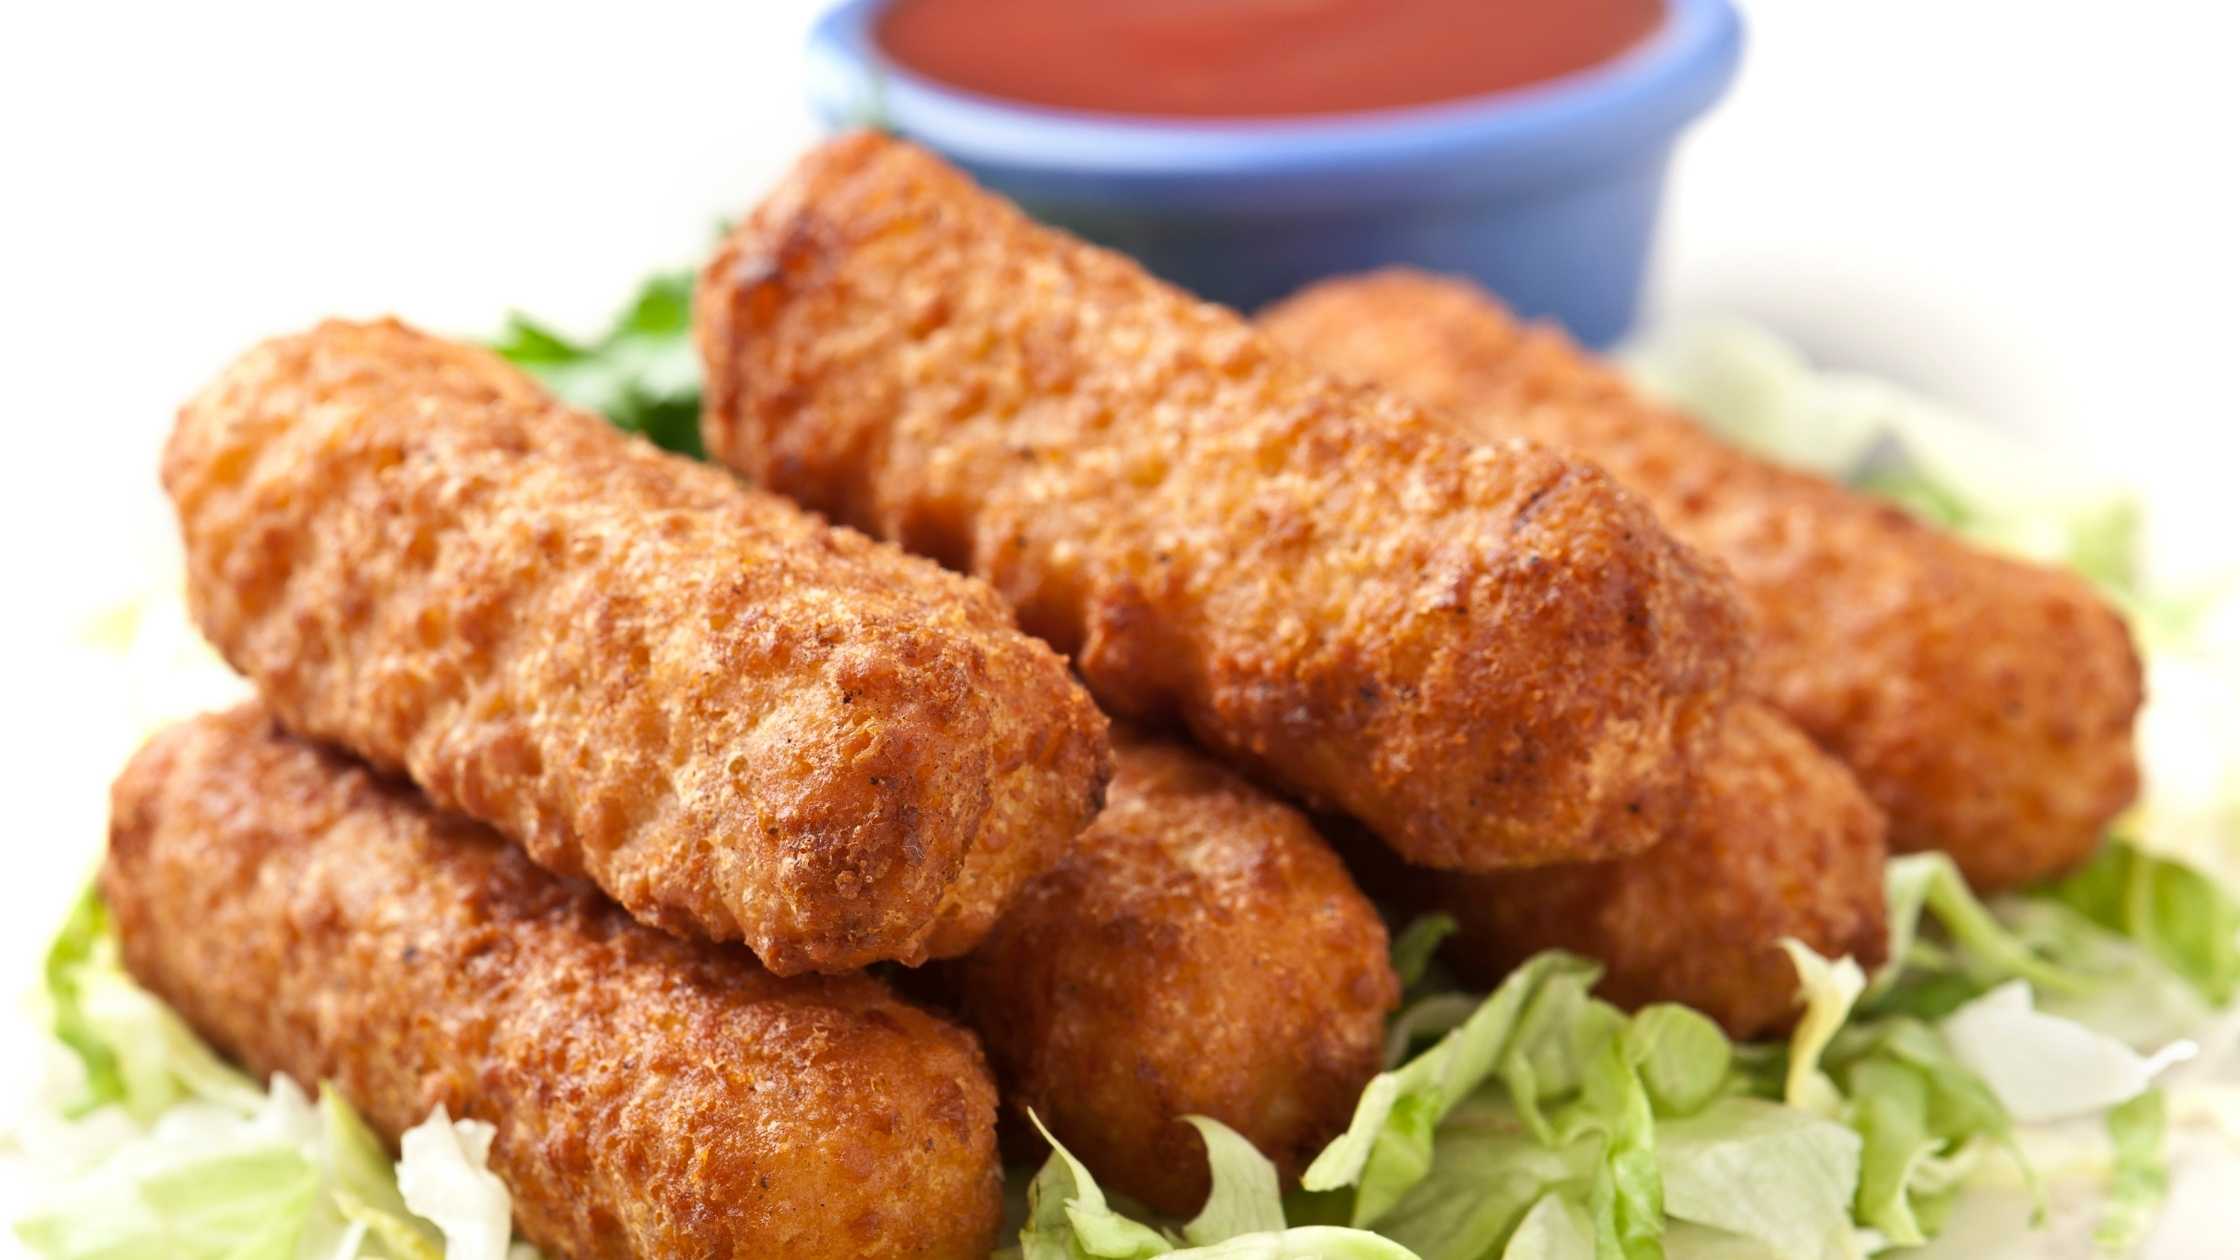
Instead of the melted cheese thing that tends to happen in a deep fryer, air frying is an easier way to make mozzarella sticks. Cut mozzarella sticks in half, dip them into beaten egg and roll in grated parmesan with 1 teaspoon of Italian seasoning. Then put them into the air fryer (spray the basket with olive oil) at 390°F for 4-6 minutes.

Fried Broccoli

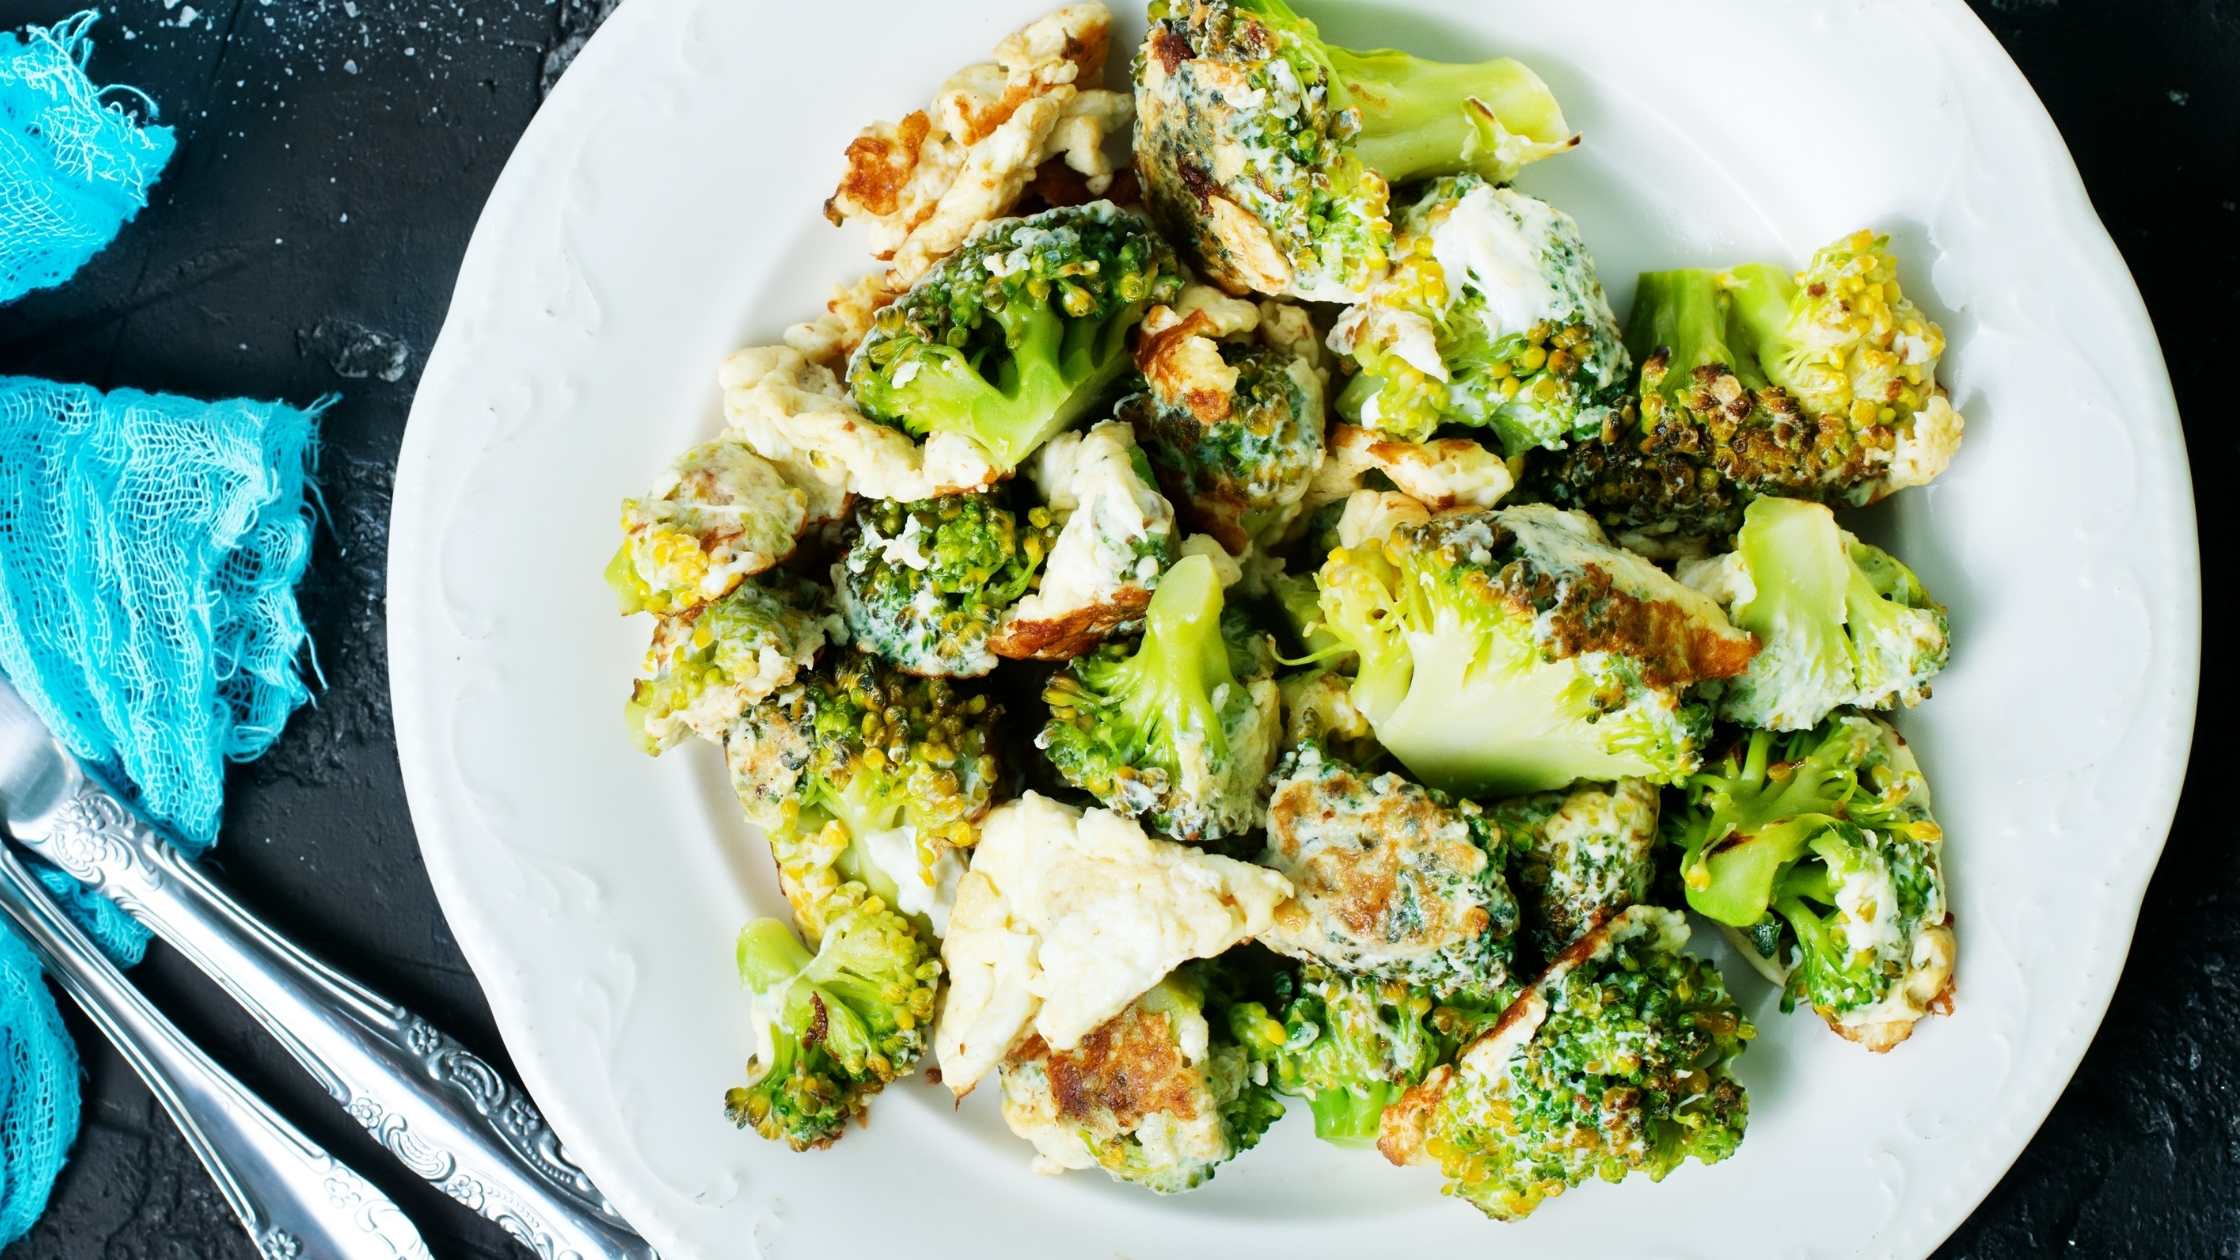
This can be a delicious way to eat broccoli. It comes out with a crispy edge. Soak small florets in water, and drain. Then roll in almond flour with a seasoning of your choice. Put into your sprayed air fryer basket and cook at 400°F for 10 minutes.

Banana Chips

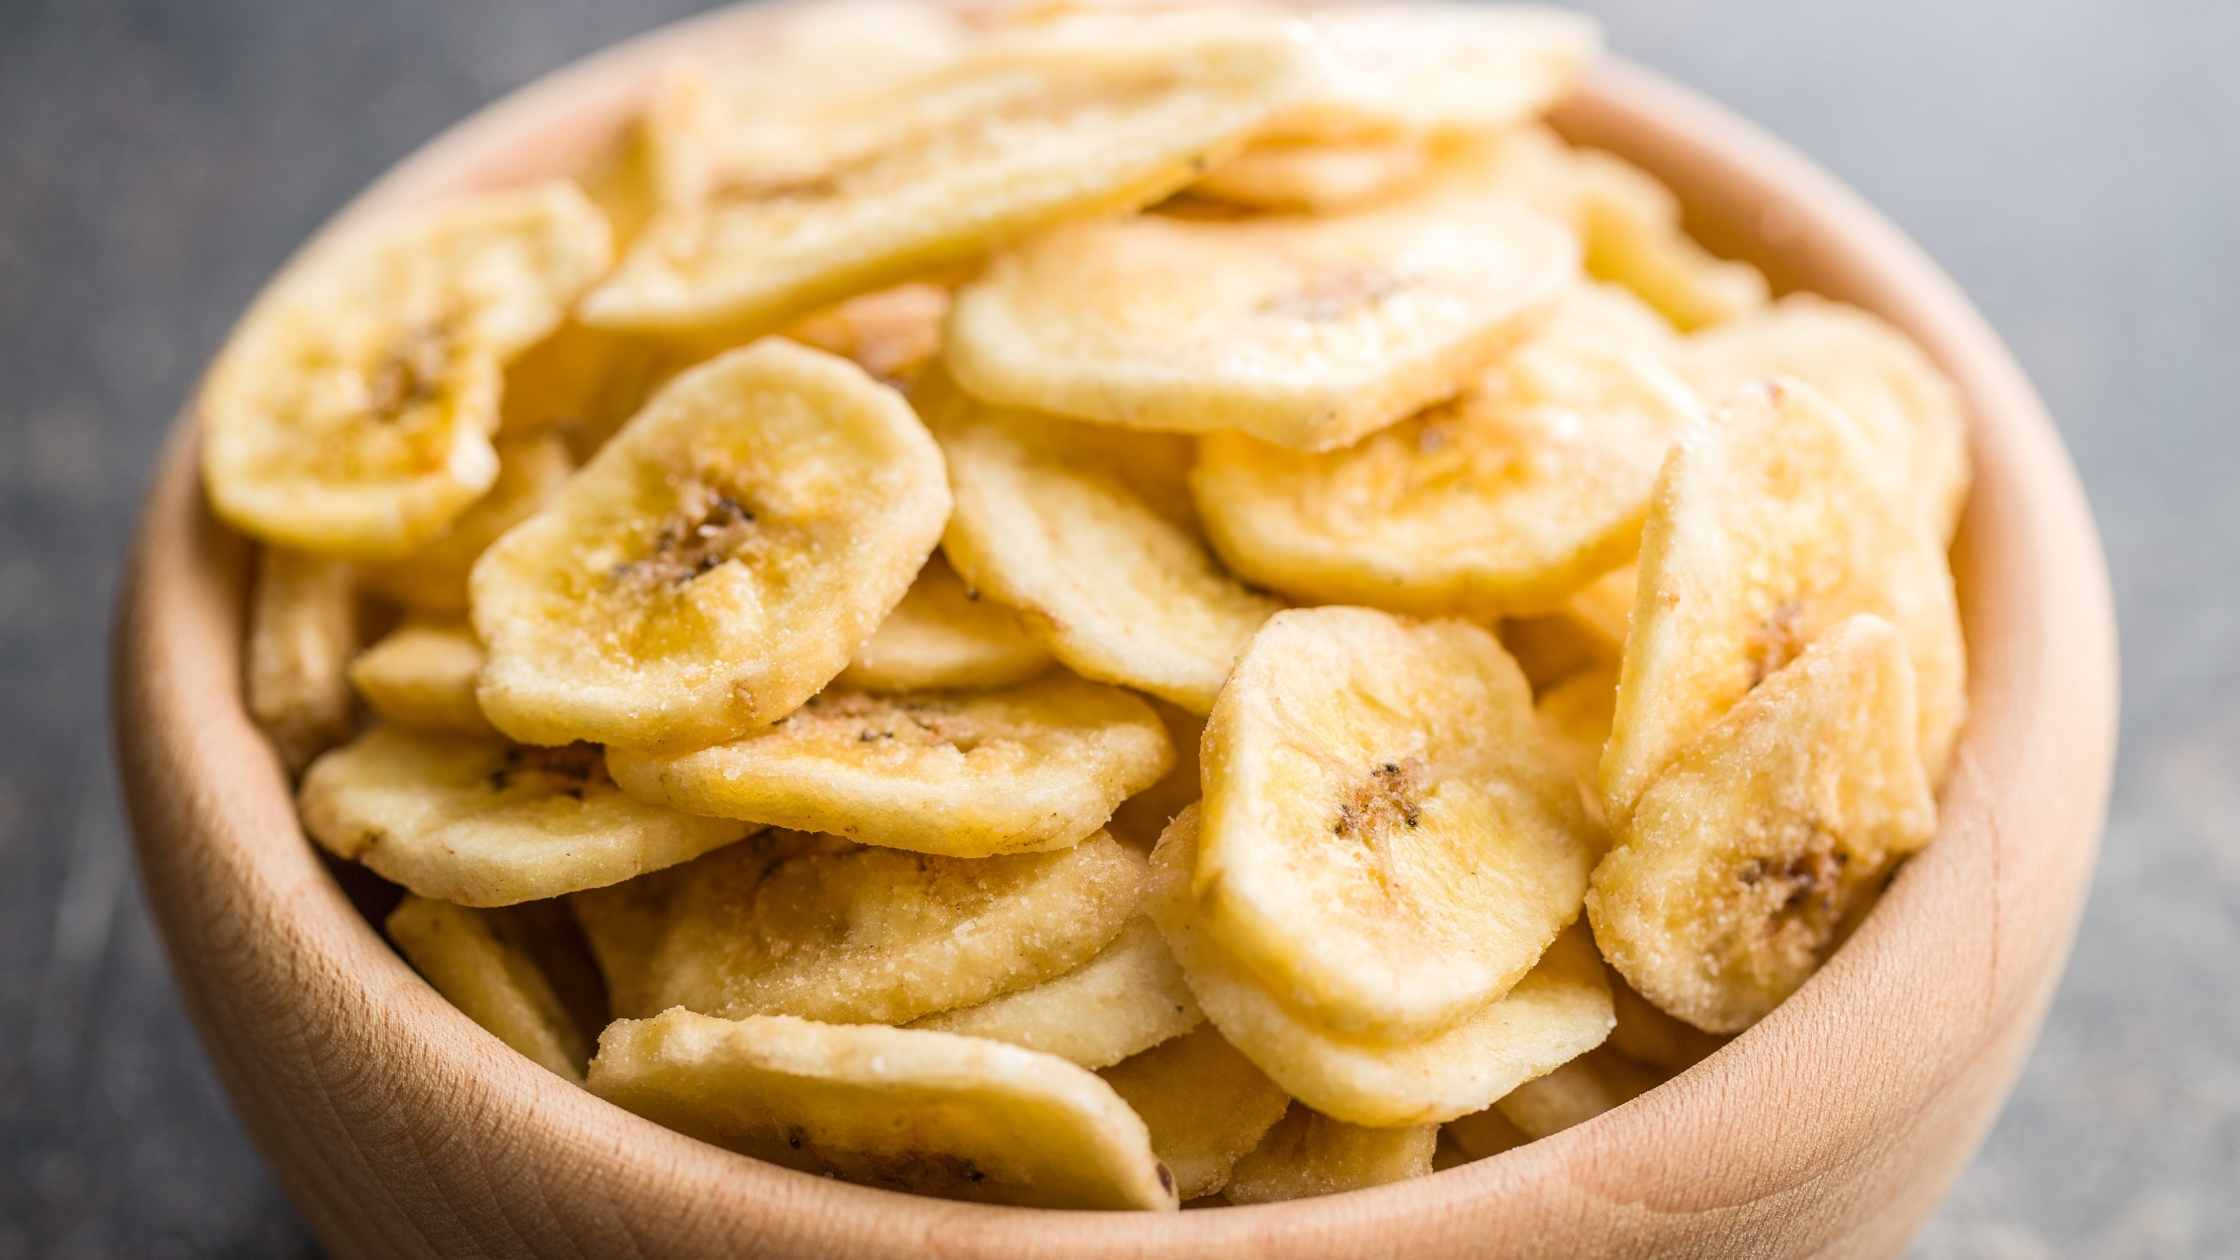
I love banana chips and this could be a great way to make them at home and skip the preservatives that they typically come with. It’s important to use bananas that are greener and not too soft or mushy. Slice thinly, mist with a little olive oil, add salt, cinnamon, or any other seasoning you’d like. Place into an oiled basket and cook at 395°F for 15 minutes.


The Self-Care And Pampering Box

I'm thrilled about the contents of this month's Lean Clean Green Subscription box. This first box has some great products and the theme for this month is self-care and pampering. Why? Because let's be honest, most of us are so busy taking care of others that we often forget to take care of ourselves. And it's difficult to carve out that time for yourself. Well now I'm sending you a self-care kit.* In a box. Delivered right to your door. So there's no excuse.

This month's products

Valor Facial Lotion - LCG BoxValor Facial Lotion

This amazing lotion is so smooth and wonderful (and it smells absolutely fabulous). One of the things I love best about it (aside from how great my face feels when I use it) is that you can actually read all of the ingredients without needing a magnifying glass. And even better, they're all real words. No degree in biochemistry needed to understand what you're putting on your face. 


Essential Living Witch Hazel - LCG Box

Essential Living Witch Hazel Toner

This wonderful toner is made from 100% American witch hazel. There's no alcohol or preservatives in the bottle, just witch hazel. Of course, I've never understood why anyone would put alcohol into something that's supposed to be good for your face, alcohol just dries out your skin.  Witch hazel is useful for:

  • Nourishing for dry skin. And if used immediately after a shower can help seal in moisture
  • Reducing acne and redness
  • Helps to relieve sunburn discomfort
  • Supportive against itching and inflammation from eczema
  • Soothing against razor burn
  • Can help reduce bruising (apply 3 times per day to the affected area)

Turkish cotton makeup towel - LCG BoxTurkish Makeup Towels

I love these towels. It honestly never occurred to me to wonder why we always use white towels to remove makeup. But after 2-3 months of daily use, you just throw it out. Even though you've been running it through the wash, it looks like an art project, with lipstick, eye-liner, eye shadow, blush, foundation, whatever you wear. And it just looks gross. Even if you don't wear much make-up, white towels still get stained with skin oils and daily pollution exposure. Now with this wonderful, soft, Turkish cotton towel, you don't have to worry about that.

Turmeric Tea and If You Care Tea FiltersTurmeric Tea + Filters - LCG Box

This tea is amazing!! I wish I had smell-o-vision right here on the screen so you could enjoy the fabulous aroma of this incredible 100%-organic-no-added-crap tea. It's delicious hot or cold and I can't make up my mind if I like it better as a morning cuppa or in the evening (even though it's called Dawn).

And these filters? They're unbleached, durable, and really wonderful. The great thing is that you can use these filters for more than just tea. Check out this video on my Facebook page to learn how else you can use them.


Himalayan Salt for Sole - LCG BoxHimalayan Salt 

Rounding out this month's amazing box is this bag with CHUNKS of Himalayan Salt.  Use this to make Sole (pronounced solay) an adrenal support drink. It is very supportive for those with low energy, fatigue, or anyone who needs a good mineral boost.  Here's how you make it:

Fill a glass jar about 1/4 of the way with Himalayan salt chunks
Fill the rest of the way with water
Let sit 24 hours so that the water becomes super-saturated
The salt will still be visible at the bottom of the jar
Take 1 teaspoon of the sole, mixed into some room temperature water first thing in the morning (if desired this can be put into a cup of nourishing broth)
Keep refilling your jar with water when it runs low
As the salt run out add another chunk

This bag should provide around 9 months of sole if used daily.

When you join the Lean, Clean, Green Subscription box family you'll get a themed box filled with holistically healthy, well-sourced products personally curated by me. Each month you pay only $47.

The August 2019 Self-Care Box is worth $78.62!!

* The best part about the box is that you're in control of how often you get it. Monthly, every other month, every three months, it's up to you. And if you miss a box, or need a refill on any of these fabulous finds, as long as you're a subscriber you have access to the Marketplace. That means you can log in and still get the items you want.

If you've just found this post and you're not a member of the Lean Clean Green family, join us, you'll be glad you did.

sprout nuts and seeds

The Easy Way To Sprout Nuts And Seeds

Why Sprout Nuts and Seeds

Nuts are one of the healthiest and nutrient-dense foods. They are known to contain high levels of key minerals such as calcium, iron, omega 3 fats, and vitamin E. Studies have shown that consuming nuts may also help fight various conditions such as cancer, heart disease, Alzheimer’s and depression.

Although rich in many nutrients, they have a mechanism that makes it rather hard for the human body to absorb these items. Enzyme inhibitors and toxic substances such as goitrogens and phytic acid make it hard both to digest and take up the nutrients contained in the nuts and seeds.

Fortunately, there’s a simple and natural way to get rid of these substances. Sprouting, sometimes referred to as soaking softens and readies the nuts or seeds for germination. When they are sprouted it forces them to get shed the phytic acids and other protective substances that ensure their survival but inhibit nutrient absorption. It also gives a little bit of a nutrient bump due to the sprouting activity.

It is, therefore, really important to soak and sprout nuts and seeds before consuming them in order to get the most nutrition possible out of them.

Once soaked, the nuts make the perfect snack or addition to your smoothies. They are also great for making nut-butters which are a great snack when added to sliced apples or pears, on celery, or used in a wide variety of recipes.

How to Sprout

Sprouting the nuts and seeds is quite simple.  All you need is a glass jar, some sea salt, water, and the nuts or seeds you want to sprout. If you're using a quart jar you can make 4 cups, a pint jar will yield 2 cups.  For ease of use, it's best to get wide-mouth canning jars.

The nuts and seeds need to be raw, unroasted, and unsalted in order for this process to work.  I do not recommend mixing the nuts and seeds together, even if they require the same amount of time for soaking. Personally, I find it better to soak each one individually. If you want to turn them into a trail mix or use them combined you can do that after they have been sprouted and dried.

Simply put the nuts in the jar, add two teaspoons of sea salt, fill it up with water and leave to soak for the required period of time.

How long to soak for sprouting

Every nut or seed has a different soaking period. Here’s a chart to help you understand the timing needed to soak each different kind.

  • Almonds – 8 to 12 hours
  • Brazil nuts – 8 hours
  • Cashew nuts – 2 to 3 hours
  • Hazelnuts (filberts) – 8 to 12 hours
  • Macadamia nuts – 2 hours
  • Pecans – 4 to 6 hours
  • Pistachio nuts – 6 to 8 hours
  • Pepitas – 8 hours
  • Sesame – 8 hours
  • Sunflower seeds (no hull) – 2 hours
  • Walnuts – 4 to 8 hours

Once you have removed the seeds and nuts from the water, you can dry them; the best way is to use a dehydrator or oven. If you opt to use the oven, set it at 150F and let the seeds and nuts dry for 12 to 24 hours. Make sure that they are completely dry before removing them. For the dehydrator, it depends on how well yours works, if you have a manual you can check it for recommended drying times.

It is important to note that not all seeds can or should be sprouted. In particular, avoid sprouting chia seeds, hemp seeds, flax seeds, and pine nuts.

Nutrients in nuts

Different nuts have different nutrients making it a good idea to snack on a variety rather than just one or two.  I find that a quick and easy trail mix is 3 parts nuts, 2 parts seeds, 1 part dried fruit.  Mixing different nuts and seeds gives you a tasty treat and a nutritional boost.

For those who really want to know:

  • Acorns – highest in manganese
  • Almonds – highest in manganese and vitamin E
  • Beechnuts – highest in manganese
  • Brazil nuts – extremely high in selenium, also a great source of manganese, phosphorus, and magnesium
  • Cashews – highest in copper, but also a good source of magnesium and tryptophan
  • Chestnuts – (European) highest in manganese
  • Hazelnuts – (also called filberts) very high in vitamin E and a good source of B vitamins
  • Hickory nuts – very high in selenium, also high in magnesium, thiamin, and copper
  • Macadamia nuts – very high in selenium and thiamin, also high in copper and magnesium
  • Peanuts – not a nut, they're actually a legume, a good source of manganese and tryptophan
  • Pecans – very high in manganese, also high in copper and thiamin
  • Pistachio – very high in B6, a good source of manganese, copper, phosphorus, and thiamin
  • Walnuts – very high in omega 3 fatty acids and a great source of manganese

Recipes

Soaked/Sprouted Nuts

Raw nuts are best but for optimal nutrient density, you can boost the nutrition by soaking them.  This breaks down the phytic acid coating, an enzyme that protects the nuts until they're ready to sprout but inhibits our ability to absorb nutrients. When soaking or sprouting the nuts you remove this phytic acid coating which makes the nutrients more bioavailable. Soaking/sprouting couldn't be simpler:

Ingredients
  

  • 4 cups of nuts
  • 2 teaspoons sea salt
  • water

Instructions
 

  • Place nuts in a quart jar, add salt, and fill with water
  • Let soak overnight
  • Drain and then dry in dehydrator or oven set at 175ºF 12-24 hours or until completely dry.

3-2-1 Trail Mix

One of my favorite ways to eat nuts is to make my 3-2-1 Trail Mix. This is a great nutrient dense snack (especially if you soak the nuts and seeds ahead of time) and perfect for on-the-go or anytime you need a quick protein boost.

Ingredients
  

  • 3 parts raw nuts (soaked/sprouted preferred)
  • 2 parts raw seeds (soaked/sprouted preferred)
  • 1 part dried fruit

Instructions
 

  • Be sure to look for dried fruit that does not have added sugar, sulfites, or other preservatives

Crock Pot Roasted Nuts

Crockpot is a brand name that has become a common usage term. They're all slow cookers and in my opinion they're one of the best kitchen devices you can own. I wanted to share another great use for your crockpot, seasoned nuts. 

Ingredients
  

  • 4 c. raw soaked nuts
  • 1/2 C. melted coconut oil
  • seasonings

Instructions
 

  • Cook on low for 2-3 hours, stirring every 30 minutes, with the lid off
  • When done turn off the crockpot and let the mixture cool completely in the crock before jarring up
  • How you season them is up to you.  I have a couple of mixes that I like but feel free to go ahead and make up your own.
    1 T. Penzey's taco seasoning + 1/2 t. hot sauce or 1 t. red pepper flakes
    1 T. tamari sauce + 1/2 t. garlic powder + 1/4 t. sea salt
    1 T. curry powder + 1/2 t. ground cinnamon
    1 T. sucanat + 2 t. ground cinnamon + 1/4 t. nutmeg
    2 t. vanilla + 2 t. sucanat + 1/2 t. pumpkin pie spice
Sources
  • https://www.fastachi.com/nuts_health_benefits
  • https://www.foodmatters.com/article/the-benefits-of-soaking-nuts-and-seeds
  • Shahidi, Fereidoon, et al. 8 Almond and Almond Products: Nutraceutical Components. Tree Nuts: Composition, Phytochemicals, and Health Effects (2008): 127.
  • Vinson, Joe A., and Yuxing Cai. Nuts, especially walnuts, have both antioxidant quantity and efficacy and exhibit significant potential health benefits. Food & function 3.2 (2012): 134-140.
  • Yadav, Mukesh, et al. “Medicinal and biological potential of pumpkin: an updated review.” Nutrition research reviews 23.2 (2010): 184-190.